Pages

Pages

Showing posts with label home. Show all posts

5.06.2015

Unconventional Materials Table Top Re-do

Well hello there guys! I am back and happy to announce that this semester is over and finished it off with two A's and one B. Now let's celebrate. Grab some pop corn and junk food because it's going to be a long one.
So I finished this project I am about to share with you guys a couple of months ago but I just never posted it and also I wanted to see how it was going to hold up. You'll see why in a minute.
When my boyfriend and I moved from Texas to Ohio all we had as far as furniture was a blow up mattress and well that was about it. That thing served as our bed, couch and dining table. Sometimes all at once. Anyway, when I finally got around to getting us a dining room table, the process took a lot longer than I expected. All of them were huge tables, cheap little dinettes or just something weird. Then it happened, the perfect size table and chairs for the space we had. So I bought it for $70 bucks..one table, an extension leaf (which I later turned into a bench) and 5 chairs. Yeah it was a little pricey but I got tired of eating on the dang blow up mattress.
Here's what it looked like when I got it.

So there it sat for months! I am serious. Getting used to life in Ohio, school and family this thing was left forgotten. I knew exactly what I wanted to do to it, yep, you guessed it, stain the top and paint the rest. The thing is the freakin' top is LAMINATE. *begin dry heaving now*

I went on Pinterest/ Google for help and got tons of ideas:
1. Replace with an old door and put glass on top of it. Nope, couldn't find an old door for a reasonable price.
2. Replace with wooden planks of some sort. Nope, really not that handy or crafty.
3. Just paint the whole thing. Nope, I was very adamant that I was going to stain the top. That's my idea and I am sticking to it.
4. Glue paint stirrers on top of it and stain. Voila! 
4 is the lucky number but of course its never that easy. I had a paint stirrer laying around from some paint that I had bought and I set it on top of the table. Immediately I realized that I needed to go back to the drawing board. The paint stirrers were just so thick and I was going to need like a saw of some sort to cut through all of them and it was a lot more work than I was willing to do. So one day walking through Wal-Mart it hit me!!!!
POPSICLE STICKS!!!!
These little things talked to me! Look even they are happy!
See the difference in thickness ^
Technically they are made of wood too and I am just going to go ahead and say it. This takes a bit of time but it is seriously so inexpensive and to me, personally I loved the effect I got at the end.
I just started placing the popsicle sticks on the table and went from there. I started laying them down randomly, subway-ish tiled, some type of design and you name it. I finally decided to just have them going all kinds of ways. I also decided that the length of them was too  long for my taste and went ahead and measured them all to 3 inches with a regular tape measure.

I scored all of them in the box with just a regular pencil. I did not now how  many I was going to end up needing (oh you have so much to learn little one) and hours of Netflix later I had scored and cut all of them. I cut them with a big pair of scissors I found in the hardware section of Walmart for a couple of bucks. They cut very easy too.
At first I decided on this pattern and started placing them down on what I thought was the center. I did measure even though it does not look like it in the angle of the picture.

Before I started gluing I roughed it up a little with some 80 grit sand paper.


 I just started gluing and gluing and watching Netflix. I put something heavy on top of them because I did notice that the sticks started to curl up at the edges.

And as you can tell, this is where it happened. I was sitting down doing thing and wasn't even noticing that I was totally off center going all kinds of ways. I had to pop every single one of these suckers off with a screw driver and a hammer (this glue is no joke), sand down the leftover glue and start all over. *hysterically laughing and dry heaving all at the same time*
As you can see, there is trial and error in everything. Not all of the things you see on Pinterest comes out perfect the first time. Don't get discouraged.
When I regained consciousness I started over, you would thing I learned my lesson but no, I wanted the same type of pattern. But this time instead of doing "V's" I started doing "L's" hope that makes sense, don't know how else to explain it.

My sanity, one day later and another box of popsicle sticks since I had to throw away most of the ones I popped off, the table was completely covered. I just went over the middle part where it I supposed to separate but I knew I was never going to use it for that. Especially since I made that bench out of the leaf.

There was a lot of gaps between many of the sticks, so clearly not all popsicle sticks/measurements are made equal. I filled it with wood filler and it looked perfect. Since the table is oval I had some pieces that did stick out quite a bit so all I did was got a tiny little hand saw from Walmart and used that to saw off the pokey edges. I went back and sanded them to get them smooth.


 After I filled all of the gaps with wood filler, I started sanding the heck out of this thing to get it as flat and smooth as possible. I made it this far so now I kind of had to go through with it.

After all was said and done and I did enough sanding to last me a lifetime, I stained it with Minwax Jacobean (the $3 sample sizes was more than enough for this table), sanded it smooth a couple more times and put a few layers of Poly. since it was going to get a lot of use.
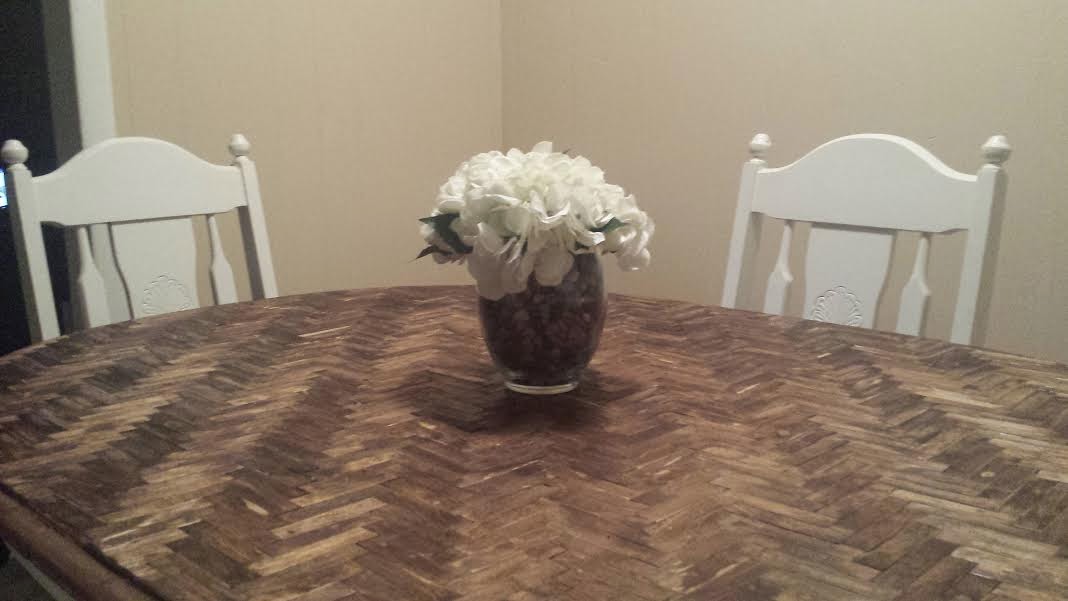
This little stinker is the biggest pain in my behind. I glued it the wrong way and I refuse to pop it off because I am scared I am going to mess everything up. It's right in the middle but my centerpiece covers it.
 As you can see it's pretty flat and people that have came over say its pretty darn smooth. It has held up perfectly as well.

Sorry for the crappy cell phone pic.
So if you are ever THIS bored or have no idea what to do your table top, I hope this helps. I did not even spend 100 bucks including the table itself to do this. All you need is popsicle sticks and patience. 

I hope you learned something new and enjoyed this little DIY. Hope you stop by again.  

2.04.2015

Table leaf turned DIY Bench

Hello world! Greetings from the worst blogger in blogger history. I am still winding down from the holidays in Texas, moving to another apt., school and adjusting to the snow (I totally underestimated the winter in the north)
 
Anyway, sorry I went off on a tangent there. So we moved into a slightly bigger apartment and you know when you move you realize how much stuff *junk* you really have. Well that is what happened.
 
I found the extension leaf to our dining room table in the attic and it was headed straight for the trash since we were never going to use it. As I was driving it to the new place I realized we needed a bit extra seating since we were going to have people over for the Superbowl and decided I was going to make some type of bench. Keep reading to find out how I did it.
 
I did not get a picture of the underside but this is what it looked like when I started. It was a perfect size too, it was 18 in. x 38in.
 
 
I unscrewed the "lip" thing it had on the underside, you know the thing that let's it blend with the rest of the table. Also, I removed some staples it had sticking out and the plastic little pegs that stick out of the side.


I took a trip to Hobby Lobby armed with my 40 % off coupon and went to work. I bought 3 inch foam, 1 yard of fabric for $9.00 and 3 packs or upholstery tacks for about $1.50 each. Foam was 30 % off that day so to my surprise the $9.00 fabric was the most expensive part * start happy dance now*
 
I have never "made" a piece of upholstered furniture before but I had a general idea and went for it. I did read that some type of serrated knife works best for cutting foam so I used my big bread knife and it worked PERFECT!.
 
 
After I arranged the pieces I took them outside to spray them. The spray adhesive did not get every where and I had pretty good control over it but just in case. I sprayed the wood itself and I sprayed the  two foam pieces as well as the section where they connect. I waited until it got tacky (however long it took me to bring the pieces back inside) and then just connected the pieces.
 
 
I flipped the entire thing over on the foam side and let gravity and the weight of leaf do the rest. I don't know if this helps but remember we are just going for it. After about 5 minutes I covered the entire thing in batting and stapled my life away.
 
I made sure to pull it really tight.
 
Now since I only bought 1 yard of fabric I knew I was going to be cutting it close but I wanted it to be tight. As you can see I barely had enough at the ends but on the other two sides I had more than enough. I pulled it super tight and did a double staple line to make sure I didn't have any loose fabric showing on the bottom and to make sure it stays.
 
 
The pulling and the stapling is where the "fun" is. The second line of stapling is much easier since everything is in place already all I had to do was go over it . Keep pliers handy because trust me you are going to need them.


I attached the tacks with a regular hammer about half inch apart. It does not show it in the picture but I did go all around.
 
I bought 14 inch legs at Lowe's for about $4 each. Sure there are cheaper ones but there caught my eye immediately. The mounting plates are about $1.50 and they are in the same section as the legs. All you do is screw them in where you want them. It is your preference but I made the mistake of getting angled ones at first and it did not look right at all. I ended up going back and getting straight ones.
 
 
I stained the legs with some leftover Minwax stain in "Provincial." The picture does not do it justice (note to self invest in good camera) but the legs are dark but not too dark. It's perfect for our space.
 
 
I am extremely happy with how this bench turned out and it help up great for the people we had here for the game. My boyfriend and I both fit on it and it didn't break with both of us on it so yay! It didn't take a lot of money and it was a good day project.
 
 
 I hope you enjoyed my little project and thank you so much for stopping by.
 

12.10.2014

Quick Key Holder Project

The other day I was at Wal-Mart just rolling down the isles wasting time. Don't judge me it's one of my hobbies. I was not planning to get anything to DIY I just wanted to see what I could find. I found this little key holder wood sign thing, it was $3 so I figured why not. Our keys where just being thrown in the corner of a bookshelf and seriously making me itch and home with me it went!


This is what the little wooden key holder looks like. You can find it in the arts and crafts section of Wal-Mart and you cant beat the $3 price.


I knew that I didn't want to paint it. I wanted to keep with the natural/rustic theme we kind of have going on (who am I kidding I am a sucker for stained wood) so I stained it with some leftover stain I had laying around from Minwax in the shade Provincial. You can get these mini cans for about $5 bucks at your home improvement store.
 
I didn't take a picture of the process *worst blogger ever* but basically what I did was got an old rag, dipped in the stain and did one coat on the wood sign front and back. Since it's in cursive there is a lot of nooks and crannies in the sign and to get to those I got a q-tip, dipped it in stain and pressed it against the spaces I could not reach with my finger. I did not sand it or seal it since it was pretty smooth already and it is just basically going to stay on the wall as a permanent fixture ha!


Isn't it pretty! Simple and cheap, this seriously took me like 10 minutes and just left it overnight to dry. I hope you guys liked it. Come back soon.


11.09.2014

Grocery Bag Organization

I can be a little OCD sometimes...just sometimes.. ok maybe all the time who am I  kidding. I used to be one of those people a long time ago that shoved all of the grocery bags in one bag. Yes it's fast but I quickly realized that it's so messy in a way and it just takes up so much room in the closet or where ever it is that you store them and if that works for you then keep doing what works but if you want to know how I keep my grocery bags (any plastic bag really) organized, keep reading!
 
 
^This makes me itch                 ^This makes me happy
 
 
I've been folding my plastic bags for years now and let me tell you it makes my life a little easier. I don't have to look for the bags because I know exactly where they are and I don't have to wrestle with them trying to separate the bag I need or what ever it is they do when they are all shoved in one bag.
 
1. After I finish putting away the groceries I put the bags that I want to keep to the side. I don't keep the ones that are all wet or have holes in them and they end up looking like this.
 
MUST.FOLD.QUICKLY!
 2. Open the bag and set it flat on the counter or where ever you are going to fold them.


3. Start folding!
 
 
 pretend you are making a little fan!
 
 
4. Once the bag is folded- start wrapping it around your fingers like so..


5. After you wrapped it around your fingers you should have the handles of the bag sticking out like so..


6. To finish just tuck the handles into the space where you had your fingers and done!


I know this seems like a lot but it seriously took me 4-5 seconds to fold one bag. It just makes my life a little more organized and after I am done folding them I just throw them into a little basket I bought at the dollar store. When people come over and see what I do to the bags they give me a weird look but once they see how easy it is they cross over to the OCD side. Conquering the world one bag at a time ha!

How do you store your plastic bags? Hope you enjoyed and thank you for stopping by.